Angular Modules
Introduction
Angular modules are a powerful feature that allows developers to organize and manage their code efficiently. In this article, we will explore various use cases of Angular modules through a fictitious company named “Fast Investment.” We will create a project with modules for banking, mutual funds, and stocks, and provide code samples to illustrate their usage.
Overview of Angular Modules
Angular modules help in organizing an application into cohesive blocks of functionality. Each module can contain components, services, directives, and pipes that are related to a specific feature or functionality. This modular approach enhances code maintainability, reusability, and scalability.
The modules are good for sharing the common components, directives, and pipes across the application. It also helps in lazy loading the modules which are not required at the time of application startup.
You can import modules in other modules to use the components, directives, and pipes defined in the imported module.
Approach in this Article
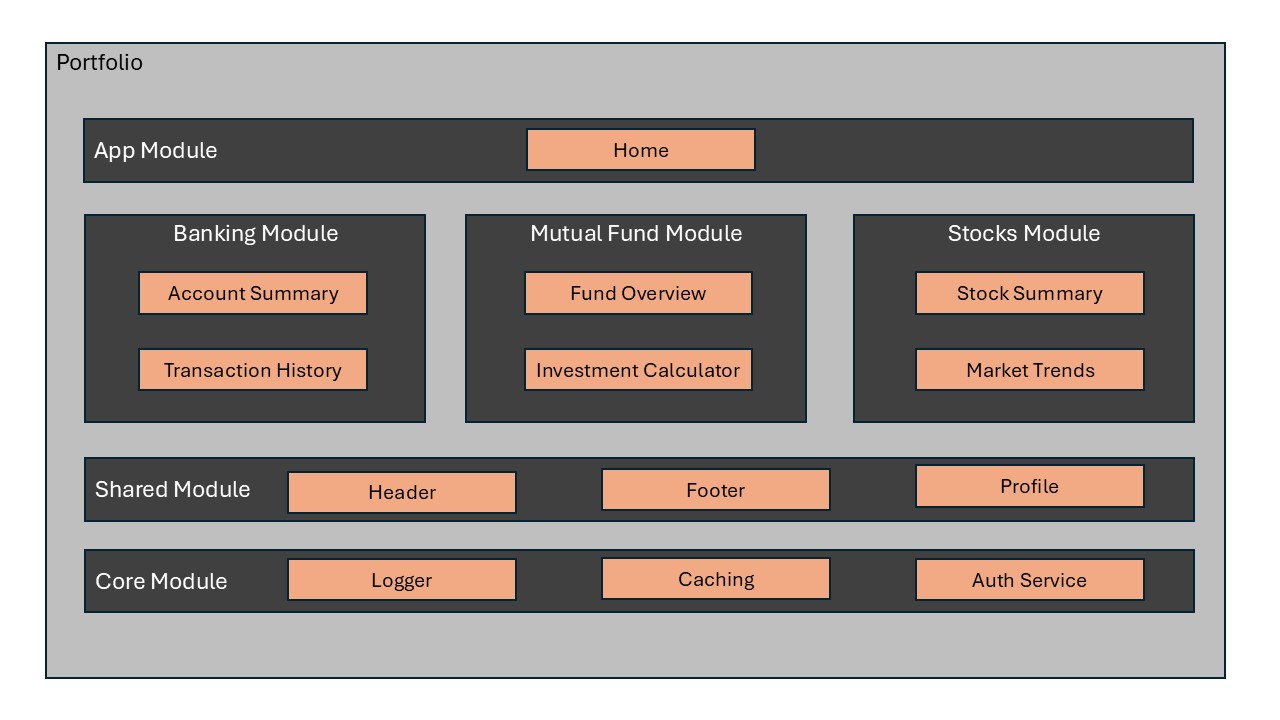
In this article, we will create a portfolio application for a fictitious company named “Fast Investments” that offers banking, mutual funds, and stocks services. We will create separate modules for each service and define components within each module to display relevant information.
The overall setup will look like this -
The core module will provide the features that are common across the application, such as the header and footer components. We will also create a shared module to house common components and services that can be used across multiple modules.
Setting Up the Project
To get started, we will create a new Angular project named portfolio using the Angular CLI.
1
2
| ng new portfolio
cd portfolio
|
Banking Module
Creating the Banking Module
First, let’s create the banking module.
1
| ng generate module banking
|
Banking Components
Account Summary Component
We will create an AccountSummaryComponent to display the user’s account summary.
1
| ng generate component banking/account-summary
|
Here is the final account-summary.component.ts
1
2
3
4
5
6
7
8
9
10
11
12
13
14
15
16
17
18
19
20
21
22
23
| import { Component, OnInit } from '@angular/core';
import { LoggerService } from '../../core/logger.service';
import { CachingService } from '../../core/caching.service';
@Component({
selector: 'app-account-summary',
templateUrl: './account-summary.component.html',
styleUrls: ['./account-summary.component.css'],
standalone: false,
})
export class AccountSummaryComponent implements OnInit {
accountBalance: number = 5000;
constructor(private logger: LoggerService,
private cache: CachingService) {
}
ngOnInit(): void {
this.cache.set('accountBalance', this.accountBalance);
const cachedBalance = this.cache.get('accountBalance');
this.logger.log('Cached Account Balance:' + cachedBalance);
}
}
|
Below is the account-summary.component.html
1
2
3
4
| <div>
<h2>Account Summary</h2>
<p>Account Balance: </p>
</div>
|
Transaction History Component
Next, we will create a TransactionHistoryComponent to display the user’s transaction history.
1
| ng generate component banking/transaction-history
|
Below is the transaction-history.component.ts
1
2
3
4
5
6
7
8
9
10
11
12
13
14
15
16
17
18
19
20
21
22
23
24
25
26
27
| import { Component, OnInit } from '@angular/core';
import { LoggerService } from '../../core/logger.service';
import { CachingService } from '../../core/caching.service';
@Component({
selector: 'app-transaction-history',
templateUrl: './transaction-history.component.html',
styleUrls: ['./transaction-history.component.css'],
standalone: false,
})
export class TransactionHistoryComponent implements OnInit {
transactions = [
{ date: '2025-01-01', amount: -100, description: 'Grocery Shopping' },
{ date: '2025-01-05', amount: 2000, description: 'Salary' },
{ date: '2025-01-10', amount: -50, description: 'Electricity Bill' }
];
constructor(private logger: LoggerService,
private cache: CachingService) {
}
ngOnInit(): void {
this.cache.set('transactions', this.transactions);
const cachedTransactions = this.cache.get('transactions');
this.logger.log('Cached Transactions:' + cachedTransactions);
}
}
|
- transaction-history.component.html
1
2
3
4
5
6
7
8
| <div>
<h2>Transaction History</h2>
<ul>
<li *ngFor="let transaction of transactions">
- :
</li>
</ul>
</div>
|
Mutual Funds Module
Creating the Mutual Funds Module
Let’s create the mutual funds module.
1
| ng generate module mutual-funds
|
Mutual Funds Components
Fund Overview Component
We will create a FundOverviewComponent to display an overview of mutual funds.
1
| ng generate component mutual-funds/fund-overview
|
- fund-overview.component.ts
1
2
3
4
5
6
7
8
9
10
11
12
13
14
15
16
17
18
19
| import { Component, OnInit } from '@angular/core';
@Component({
selector: 'app-fund-overview',
templateUrl: './fund-overview.component.html',
styleUrls: ['./fund-overview.component.css']
})
export class FundOverviewComponent implements OnInit {
funds = [
{ name: 'Equity Fund', value: 10000 },
{ name: 'Debt Fund', value: 5000 },
{ name: 'Hybrid Fund', value: 7500 }
];
constructor() { }
ngOnInit(): void {
}
}
|
- fund-overview.component.html
1
2
3
4
5
6
7
8
| <div>
<h2>Fund Overview</h2>
<ul>
<li *ngFor="let fund of funds">
:
</li>
</ul>
</div>
|
Investment Calculator Component
Next, we will create an InvestmentCalculatorComponent to help users calculate their potential returns.
1
| ng generate component mutual-funds/investment-calculator
|
- investment-calculator.component.ts
1
2
3
4
5
6
7
8
9
10
11
12
13
14
15
16
17
18
19
20
21
22
| import { Component, OnInit } from '@angular/core';
@Component({
selector: 'app-investment-calculator',
templateUrl: './investment-calculator.component.html',
styleUrls: ['./investment-calculator.component.css']
})
export class InvestmentCalculatorComponent implements OnInit {
principal: number = 1000;
rateOfReturn: number = 5;
years: number = 10;
futureValue: number = 0;
constructor() { }
ngOnInit(): void {
}
calculateFutureValue(): void {
this.futureValue = this.principal * Math.pow((1 + this.rateOfReturn / 100), this.years);
}
}
|
- investment-calculator.component.html
1
2
3
4
5
6
7
8
9
10
11
| <div>
<h2>Investment Calculator</h2>
<label for="principal">Principal:</label>
<input id="principal" [(ngModel)]="principal" type="number">
<label for="rateOfReturn">Rate of Return (%):</label>
<input id="rateOfReturn" [(ngModel)]="rateOfReturn" type="number">
<label for="years">Years:</label>
<input id="years" [(ngModel)]="years" type="number">
<button (click)="calculateFutureValue()">Calculate</button>
<p>Future Value: </p>
</div>
|
Stocks Module
Creating the Stocks Module
Let’s create the stocks module.
1
| ng generate module stocks
|
Stocks Components
Stock Portfolio Component
We will create a StockPortfolioComponent to display the user’s stock portfolio.
1
| ng generate component stocks/stock-portfolio
|
- stock-portfolio.component.ts
1
2
3
4
5
6
7
8
9
10
11
12
13
14
15
16
17
18
19
| import { Component, OnInit } from '@angular/core';
@Component({
selector: 'app-stock-portfolio',
templateUrl: './stock-portfolio.component.html',
styleUrls: ['./stock-portfolio.component.css']
})
export class StockPortfolioComponent implements OnInit {
stocks = [
{ name: 'AAPL', quantity: 10, price: 150 },
{ name: 'GOOGL', quantity: 5, price: 2800 },
{ name: 'AMZN', quantity: 2, price: 3400 }
];
constructor() { }
ngOnInit(): void {
}
}
|
- stock-portfolio.component.html
1
2
3
4
5
6
7
8
| <div>
<h2>Stock Portfolio</h2>
<ul>
<li *ngFor="let stock of stocks">
: shares @
</li>
</ul>
</div>
|
Market Trends Component
Next, we will create a MarketTrendsComponent to display current market trends.
1
| ng generate component stocks/market-trends
|
- market-trends.component.ts
1
2
3
4
5
6
7
8
9
10
11
12
13
14
15
16
17
18
19
| import { Component, OnInit } from '@angular/core';
@Component({
selector: 'app-market-trends',
templateUrl: './market-trends.component.html',
styleUrls: ['./market-trends.component.css']
})
export class MarketTrendsComponent implements OnInit {
trends = [
{ name: 'Tech', change: 2.5 },
{ name: 'Healthcare', change: -1.2 },
{ name: 'Finance', change: 0.8 }
];
constructor() { }
ngOnInit(): void {
}
}
|
- market-trends.component.html
1
2
3
4
5
6
7
8
| <div>
<h2>Market Trends</h2>
<ul>
<li *ngFor="let trend of trends">
: %
</li>
</ul>
</div>
|
Shared Module
Creating the Shared Module
To avoid code duplication and promote reusability, we will create a shared module for common components and services.
1
| ng generate module shared
|
Shared Components and Services
We will create a HeaderComponent to display a common header across the application.
1
| ng generate component shared/header
|
1
2
3
4
5
6
7
8
9
10
11
12
13
14
15
16
| import { Component, OnInit } from '@angular/core';
@Component({
selector: 'app-header',
templateUrl: './header.component.html',
styleUrls: ['./header.component.css'],
standalone: false,
})
export class HeaderComponent implements OnInit {
companyName: string = 'Fast Investment';
constructor() { }
ngOnInit(): void {
}
}
|
1
2
3
4
5
6
7
8
| <header>
<h1></h1>
<nav>
<a routerLink="/app/banking">Banking</a>
<a routerLink="/app/mutual-funds">Mutual Funds</a>
<a routerLink="/app/stocks">Stocks</a>
</nav>
</header>
|
Next, we will create a FooterComponent to display a common footer across the application.
1
| ng generate component shared/footer
|
1
2
3
4
5
6
7
8
9
10
11
12
13
14
15
16
| import { Component, OnInit } from '@angular/core';
@Component({
selector: 'app-footer',
templateUrl: './footer.component.html',
styleUrls: ['./footer.component.css'],
standalone: false,
})
export class FooterComponent implements OnInit {
currentYear: number = new Date().getFullYear();
constructor() { }
ngOnInit(): void {
}
}
|
1
2
3
| <footer>
<p>© Fast Investment. All rights reserved.</p>
</footer>
|
Profile Component
We will create a ProfileComponent to display user profile information. This component will be part of the shared module.
1
| ng generate component shared/profile
|
1
2
3
4
5
6
7
8
9
10
11
12
13
14
15
16
17
18
19
20
21
| profile.component.ts
import { Component, OnInit } from '@angular/core';
@Component({
selector: 'app-profile',
templateUrl: './profile.component.html',
styleUrls: ['./profile.component.css']
})
export class ProfileComponent implements OnInit {
user = {
name: 'pravin c',
email: 'pravin.c@git.com',
phone: '123-456-7890'
};
constructor() { }
ngOnInit(): void {
}
}
|
1
2
3
4
5
6
| <div>
<h2>User Profile</h2>
<p><strong>Name:</strong> </p>
<p><strong>Email:</strong> </p>
<p><strong>Phone:</strong> </p>
</div>
|
Home Component
Home component will be used to load the home page for application which will redirect the user to a default route in banking module. This page will also show the header and footer components.
1
| ng generate component shared/home
|
1
2
3
4
5
6
7
8
9
10
11
| import { Component } from '@angular/core';
@Component({
selector: 'app-home',
standalone: false,
templateUrl: './home.component.html',
styleUrl: './home.component.css'
})
export class HomeComponent {
}
|
1
2
3
| <app-header></app-header>
<router-outlet></router-outlet>
<app-footer></app-footer>
|
Core Module
Creating the Core Module
The core module will provide services that are common across the application, such as authentication, logging, caching, and notifications.
1
| ng generate module core
|
Core Services
AuthService
We will create an AuthService to handle authentication across the application.
1
| ng generate service shared/auth
|
1
2
3
4
5
6
7
8
9
10
11
12
13
14
15
16
17
18
19
20
21
22
23
24
25
26
27
| import { Injectable } from '@angular/core';
@Injectable({
providedIn: 'root'
})
export class AuthService {
private isAuthenticated: boolean = false;
constructor() { }
login(username: string, password: string): boolean {
// Simulate authentication
if (username === 'user' && password === 'password') {
this.isAuthenticated = true;
return true;
}
return false;
}
logout(): void {
this.isAuthenticated = false;
}
isLoggedIn(): boolean {
return this.isAuthenticated;
}
}
|
Logger Service
We will create a LoggerService to handle logging across the application.
1
| ng generate service core/logger
|
1
2
3
4
5
6
7
8
9
10
11
12
13
14
15
16
17
18
19
20
21
22
| import { Injectable } from '@angular/core';
@Injectable({
providedIn: 'root'
})
export class LoggerService {
log(message: string): void {
console.log(`LoggerService: ${message}`);
}
error(message: string): void {
console.error(`LoggerService: ${message}`);
}
warn(message: string): void {
console.warn(`LoggerService: ${message}`);
}
info(message: string): void {
console.info(`LoggerService: ${message}`);
}
}
|
Caching Service
We will create a CachingService to handle caching across the application.
1
| ng generate service core/caching
|
1
2
3
4
5
6
7
8
9
10
11
12
13
14
15
16
17
18
19
20
21
22
23
24
| import { Injectable } from '@angular/core';
@Injectable({
providedIn: 'root'
})
export class CachingService {
private cache = new Map<string, any>();
set(key: string, value: any): void {
this.cache.set(key, value);
}
get(key: string): any {
return this.cache.get(key);
}
clear(): void {
this.cache.clear();
}
remove(key: string): void {
this.cache.delete(key);
}
}
|
App Level Changes
Update AppModule
Update AppModule class to import the dependent modules. This helps the DI framework resolve dependencies properly
1
2
3
4
5
6
7
8
9
10
11
12
13
14
15
16
17
18
19
20
21
22
23
| import { NgModule } from '@angular/core';
import { BrowserModule } from '@angular/platform-browser';
import { AppRoutingModule } from './app-routing.module';
import { AppComponent } from './app.component';
import { SharedModule } from './shared/shared.module';
import { FormsModule } from '@angular/forms';
import { CoreModule } from './core/core.module';
@NgModule({
declarations: [
AppComponent
],
imports: [
BrowserModule,
FormsModule,
AppRoutingModule,
SharedModule,
CoreModule
],
providers: [],
bootstrap: [AppComponent]
})
export class AppModule { }
|
App Component HTML
Update the html file to include a router-outlet and let Angular handle the loading part
1
| <router-outlet></router-outlet>
|
App Routing
Finally app routing we can update to include the default route and other nested routes between the 3 modules.
1
2
3
4
5
6
7
8
9
10
11
12
13
14
15
16
17
18
19
20
21
22
23
24
25
26
27
28
29
30
31
32
33
34
35
36
37
38
39
40
41
42
43
44
45
| import { NgModule } from '@angular/core';
import { RouterModule, Routes } from '@angular/router';
import { HomeComponent } from './shared/home/home.component';
const routes: Routes = [
{
path: 'app',
component: HomeComponent,
children: [
{
path: 'banking',
loadChildren: () => import('./banking/banking.module')
.then(mod => mod.BankingModule)
},
{
path: 'mutual-funds',
loadChildren: () => import('./mutual-funds/mutual-funds.module')
.then(mod => mod.MutualFundsModule)
},
{
path: 'stocks',
loadChildren: () => import('./stocks/stocks.module')
.then(mod => mod.StocksModule)
},
{
path: '', pathMatch: 'full', redirectTo: 'banking'
},
{
path: '**', pathMatch: 'full', redirectTo: 'banking',
}
]
},
{
path: '', pathMatch: 'full', redirectTo: 'app/banking',
},
{
path: '**', pathMatch: 'full', redirectTo: 'app/banking',
}
];
@NgModule({
imports: [RouterModule.forRoot(routes)],
exports: [RouterModule]
})
export class AppRoutingModule { }
|
Running the app
You can build the app from command line using the below commands
Navigate to project directory and run the below command to install all dependencies.
Once the dependencies are installed you can run the app by using below command
This will open a new tab in browser and you can navigate between different modules. If you notice from network tab, you would observe that only the needed modules are loaded. This results in faster loading of application and avoid unnecessary downloads to user machine. This lazy loading helps in making the application perform well.
Source Code
The source code for this project is available on GitHub. You can find it at the following link:
Code Sample
Feel free to explore the code, open issues, and contribute!
Conclusion
In this article, we explored the different use cases of Angular modules through a fictitious company named “Fast Investment.” We created a project with modules for banking, mutual funds, and stocks, and provided code samples to illustrate their usage. By organizing our application into cohesive blocks of functionality, we can enhance code maintainability, reusability, and scalability.
Angular modules are a powerful tool for any Angular developer, and understanding how to use them effectively can greatly improve the structure and efficiency of your applications. We hope this article has provided you with valuable insights and practical examples to help you get started with Angular modules.
Hope this was helpful, please leave your comment if you would like something else to be covered as well.